Highlights (Key Facts & Solutions)
- Critical Need: Backing up the QuickBooks company file is necessary to retrieve data easily following system errors, malicious intrusion, or when migrating data to a different computer.
- Checking Status: Users should navigate to the File menu, hover over Back Up Company, to instantly check the date and time of the last successful backup.
- QuickBooks Desktop (Windows) Backup Options: The guide provides steps for three methods, all requiring you to Switch to Single-user Mode initially :
- Manual Backup: Select Create Local Backup and choose Save it now.
- Automatic Backup (On Close): Saves a copy automatically to the local Auto Backup folder each time the company file is closed, based on a set frequency.
- Scheduled Unattended Backup: Runs periodically without user intervention, requiring the Windows sign-in password for permission to execute the background task.
- Data Integrity Check: Both manual and automatic backups should include selecting Complete Verification to run a test that ensures the integrity and usability of the backup file before it is saved.
- Mac/Apple Backup: Specific instructions confirm that Mac users access backup settings via QuickBooks > Settings > Backup to set automatic frequency and destination, including options to Encrypt files with a password and back up the attached documents library.
Overview
For any business using QuickBooks, it’s crucial to create backups of your company file consistently. Having a backup of your QuickBooks data is a proactive measure to safeguard your information against unforeseen events that may make the original files unusable.
If the system where QuickBooks is installed encounters any error/problem or malicious intrusion, you can easily retrieve the data from the latest backup, preventing any data loss and inconvenience.
Having a backup of QuickBooks files is also particularly useful if you need to move the data to a different computer.
Note: Before moving on to the how to backup company file, you may want to check when the last backup company file was saved.
To check the last backup time of the company file,
- Step: Navigate to the file menu.
- Step: Hover the cursor over the “Back Up Company” option.
The date and time of the last backup will now be displayed.

How to Backup Company File In QuickBooks Desktop?
Manual Backup Process
You can back up your QuickBooks company file automatically, or you can manually create a backup anytime you want.
To create a backup, manually complete the following steps:
- Step: Launch QuickBooks and navigate to the File menu.
- Step: Choose the option to Switch to Single-user Mode.
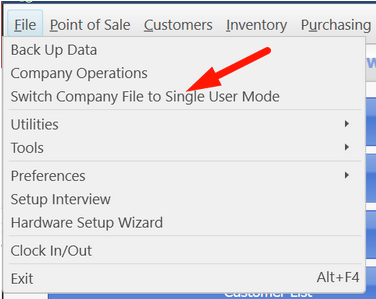
- Step: Hover the course over the Back Up Company option and click on Create Local Backup.
- Step: A window will appear, in which select the Local Backup option followed by clicking on Next.
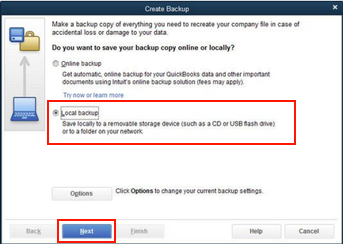
- Step: In the section labeled Local Backup Only, click on Browse and choose the location where you wish to store your backup company file.
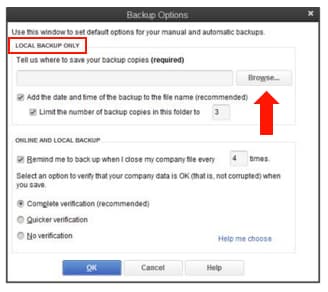
- Step: Specify the number of backups to be created. (not mandatory) A test will be launched to ensure the integrity of your backup file before saving.
- Step: After the test is over, click on OK.
- Step: Choose the “Save it now” option and then click on Next.
QuickBooks will then generate the specified number of company file backups. Upon completion, a confirmation message will be displayed.
Automatic Update
QuickBooks offers two automatic backup options for your files. The first option (A) is to generate a backup file each time you close the company file, with the frequency you set. This backup file is stored on your hard drive in the QuickBooks directory, specifically in a folder named “Auto Backup.”
The second option (B) allows you to schedule backups that run without your intervention. This means you don’t need to be using QuickBooks or even be at your computer. This backup file can only be saved on a local or network hard drive, and the company file must be closed during a scheduled backup.
To set up QuickBooks to automatically backup company file complete the following steps:
- Step: Navigate to the File menu and select Switch to Single-user Mode.
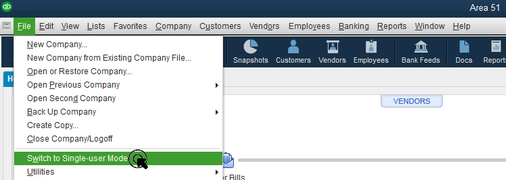
- Step: Hover the course over the Back Up Company option and click on Create Local Backup.
- Step: A window will appear, in which select the Local Backup option and then Next.
- Step: In the Local Backup Only section, click Browse and choose your desired save location for the backup company file.
- Step: Set up the default backup option as required.
- Step: From under the Online and Local Backup section, select Complete Verification. This initiates a test to ensure the integrity of your backup file before saving.
- Step: Click on OK and then Next.
Choose the (A) Save it Now and schedule future backups option or select (B)Only schedule future backups.
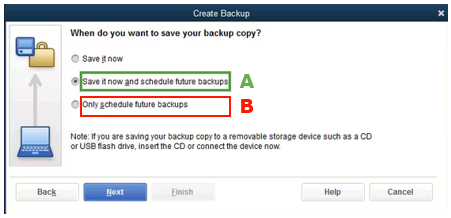
(A). Automatically Backup When Closing Company File
- Step (A): Choose the (A) Save it Now and schedule future backups option, and click Next.
- Step (A): From under the BACK UP AUTOMATICALLY section, check the box for Save backup copy automatically when I close my company file and specify the number of times between backups.

- Step (A): Very the inputs and click on Finish to complete the process.
QuickBooks now will create a backup and schedule your future backups simultaneously. Upon completion, a confirmation message will be displayed
(B). Schedule a Periodic Automatic Backup
- Step 8(B): Choose the (B) Only schedule future backups option, and click Next.
- Step 9(B): To set a schedule, click New. Fill in the data fields to establish a backup schedule. You can specify a particular time or day of the week.
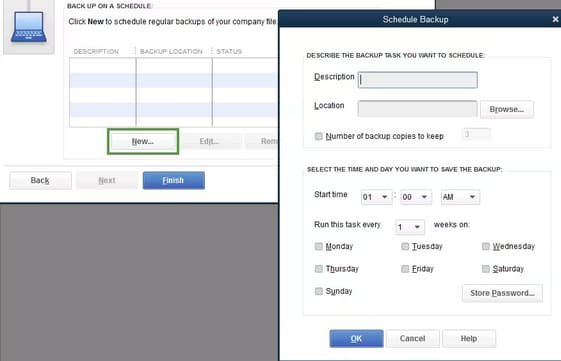
- Step(B): After setting your schedule, click OK. QuickBooks will prompt you to enter your Windows sign-in password, granting QuickBooks permission to execute the scheduled backup.
- Step(B): Verify the inputs and click Finish to complete the process. QuickBooks will now schedule your future backups as configured.
How to Backup QuickBooks Company File on Mac/Apple Devices?
Manual Backup Process
Complete the following steps to manually create a backup of your company file on a Mac device:
- Step: Launch QuickBooks,
- Step: Navigate to File and choose the Back Up option.
- Step: Choose the location where you want to save your backup.
- Step: Click on Start Backup.
You will see a confirmation on your screen when the backup is complete.
Scheduling Automatic Backups
Complete the following steps to schedule automatic backups of your company file:
- Step: Launch QuickBooks and select the Settings option.
- Step: Choose the Backup option.
- Step: Choose backup preferences as required. You will see the below backup option on your screen:
- This implies that only your latest backup will be stored. Password-protect files: If you want your backups to be password-protected, select Change and input a password. Backup library of attached documents: Decide if you want to back up attachments that you’ve linked to QuickBooks records and transactions.
- Automatically back up company files every x hours: Decide the frequency with which QuickBooks should back up your business file within a day(every 24 hours).
- Automatically back up company files when closing: Decide if you want your files to be backed up when you exit QuickBooks.
- Save backup files in: Decide the location where QuickBooks should store your backup files. It’s recommended to use a separate drive or computer and save it locally, ensuring you can access your backup if needed.
- Overwrite last backup: Decide if you want QuickBooks to replace your previous backup file.
- Encrypt files with password: If you want your backups to be password protected, select Change and input a password.
- Back up attached documents library: Decide if you want to back up attachments that you’ve linked to QuickBooks records and transactions.
- This implies that only your latest backup will be stored. Password-protect files: If you want your backups to be password-protected, select Change and input a password. Backup library of attached documents: Decide if you want to back up attachments that you’ve linked to QuickBooks records and transactions.
- Step: Once you have chosen and verified the required insults, save the changes.
- Step: Now close the QuickBooks Backup settings window to exit and complete the process.
Conclusion
Backing up your QuickBooks corporation file is essential to guarantee the security and integrity of your financial data. Whether you select manual backups, automated updates, or scheduling periodic backups, QuickBooks delivers diverse options to suit your corporation’s needs. Recurring backups safeguard your corporation file from unanticipated errors, data corruption, or security breaches.
Still have questions? Explore our detailed FAQs.
Disclaimer: The information outlined above for “How to Backup QuickBooks Company File? – (Manually/Automatically/Schedule an Unattended Backup)” is applicable to all supported versions, including QuickBooks Desktop Pro, Premier, Accountant, and Enterprise. It is designed to work with operating systems such as Windows 7, 10, and 11, as well as macOS.
