Excerpt:
If your QuickBooks printing keeps defaulting to double-sided, it can cause delays and disrupt workflows. This issue typically occurs when a new printer is set up, as the default duplex printing option is enabled. To resolve this, disable the duplex printing setting in Windows, third-party programs, or directly in the printer’s menu. Follow specific troubleshooting steps to ensure your printer is set up correctly, update your QuickBooks, and run repair tools for smooth printing without defaults.
 Add As A Preferred
The QuickBooks Desktop “Printer Keeps Defaulting to Double‑sided” error occurs when the printer automatically forces duplex (two‑sided) printing, even if you want single‑sided output. This disrupts invoices, checks, and reports, often wasting paper and causing formatting issues.
It usually happens because the printer driver or Windows system defaults are set to duplex, QuickBooks print settings are corrupted, or templates carry duplex instructions. Outdated drivers, incorrect installation, or spooler conflicts can also reset the printer to double‑sided mode.
The error typically shows up after installing or using a new printer, updating Windows, reinstalling QuickBooks, or changing printer drivers. It may also appear when printing directly from QuickBooks without adjusting system‑level preferences.
Users don’t always see a formal error popup, instead, the issue manifests as QuickBooks printing documents double‑sided by default, with no visible option to deselect duplex in the print dialog. This behavior itself acts as the “error message.”
Here are the most common reasons:
Before making changes, ensure:
| Level | Step | Method | Detailed Steps | Purpose/Outcome |
| Beginner | 1 | Turn Off Printer’s Duplex Default | – Go to Devices & Printers in Windows- Right‑click printer → Printing Preferences- Look under Page Layout or Advanced tabs- Disable duplex/double‑sided printing- Save changes | Stops driver defaults from forcing duplex. |
| Beginner | 2 | Reset QuickBooks Print Settings | – Close QuickBooks- Locate and rename QBPrint.qbp- Restart QuickBooks (new file auto‑created) | Clears corrupted QuickBooks print settings. |
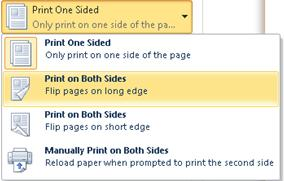
| Intermediate | 3 | Deselect Duplex in Third‑party Software | – In Word: disable Print on Both Sides- In Chrome: uncheck Two‑sided | Prevents app‑level duplex overrides. |
| Intermediate | 4 | Disable Duplex via Printer Menu Screen | – Use printer’s onboard menu (independent of Windows)- Navigate to General or ECO settings- Turn off duplex printing | Fixes hardware‑level duplex defaults. |
| Intermediate | 5 | Update/Reinstall Printer Driver | – Visit manufacturer’s website- Download and install latest driver- Restart system and test QuickBooks printing | Ensures compatibility after updates. |
| Intermediate | 6 | Apply New QuickBooks Template | – Create new invoice/check template in QuickBooks- Apply it to transactions- Test printing | Fixes template corruption that may force duplex. |
| Advanced | 7 | Run QuickBooks PDF & Print Repair Tool | – Open QuickBooks Tools Hub- Go to Program Problems → run Print & PDF Repair Tool- Restart system and test printing | Automated repair of QuickBooks print components. |
| Advanced | 8 | Reset System Print Spooler | – Open Services.msc- Locate Print Spooler → restart service- Clear spool folder contents | Fixes spooler conflicts resetting duplex defaults. |
| Advanced | 9 | macOS CUPS Settings (Mac users) | – Open Terminal → run: sudo cupsctl WebInterface=yes- Go to http://localhost:631 in browser- Select printer → Administration → Set Default Options- Change 2‑Sided Printing to Off (1‑Sided) | Stops duplex defaults on macOS systems. |
Step 1: Turn Off Printer’s Duplex Default
Save changes.
Step 2: Reset QuickBooks Print Settings
Restart QuickBooks (a new file will be auto‑created).
Step 3: Deselect Duplex in Third‑party Software
In Chrome: uncheck Two‑sided.
Step 4: Disable Duplex via Printer Menu Screen
Turn off duplex printing.
Step 5: Update/Reinstall Printer Driver
Restart system and test QuickBooks printing.
Step 6: Apply New QuickBooks Template
Test printing.
Step 7: Run QuickBooks PDF & Print Repair Tool
Restart system and test printing.
Step 8: Reset System Print Spooler
Clear spool folder contents.
Step 9: macOS CUPS Settings (for Mac users)
Change 2‑Sided Printing to Off (1‑Sided).
The QuickBooks Desktop “Printer Keeps Defaulting to Double‑sided” error is usually caused by driver defaults, corrupted print settings, or Windows overrides. By systematically disabling duplex in printer preferences, QuickBooks settings, third‑party apps, and even macOS CUPS, you can restore proper single‑sided printing. Preventive steps like keeping drivers updated, maintaining backups, and verifying settings after updates ensure smooth printing operations without repeated disruptions.
Printers have the ability to automatically print on both sides of a sheet of paper, known as automatic duplex printing.
Launch the terminal and type “sudo cupsctl webinterface=yes.” When prompted, enter the admin password and then refresh the safari view to enable the cups page.
Because duplex printing is enabled.
To print on both sides of the paper in one print job, adhere to the following steps:
Note: Menu options vary by printer model.
Follow these steps to turn off double-sided printing in Microsoft:
For this, go through the steps mentioned below: