QuickBooks Error 1327 appears when the installer tries to access a drive letter that isn’t available, isn’t valid, or isn’t properly mapped on your system. In simple terms, the installation stops because the setup is pointing to a drive Windows cannot recognize.
This usually happens when your computer has incorrect drive paths, outdated registry entries, disconnected external storage, or damaged system components that the installer depends on. When any of these paths break, QuickBooks can’t continue the installation and immediately shows the “Invalid Drive” message.
In this guide, you’ll walk through everything you need to resolve the issue step-by-step. You’ll learn the root causes behind Error code 1327 or C=1327, how to confirm the exact trigger on your system, the primary fixes that correct invalid drive references, and the advanced adjustments you can use when the installer still fails.
The goal is simple: to help you restore a clean, valid drive configuration so QuickBooks can install smoothly without interruptions.
What Is QuickBooks Error 1327?
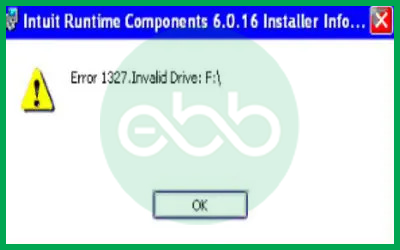
QuickBooks Error 1327 is an installation error that appears when the setup program tries to access a drive letter that Windows cannot reach or no longer recognizes. When this happens, you typically see messages like “Invalid Drive” or “The drive is invalid” during installation.
You may also see the variation “Error C=1327”, which refers to the same underlying problem. Both point to one core issue: the installer is referencing a drive path that isn’t valid, isn’t connected, or doesn’t exist anymore.
This error is tied specifically to incorrect or inaccessible installation paths, not to damaged company files or data corruption. In other words, QuickBooks isn’t failing because of your accounting data—it’s failing because Windows cannot locate the drive the installer is trying to use.
You usually encounter this error when:
• A drive letter was changed or removed
• An external or network drive was disconnected
• Registry entries reference outdated or incorrect drive paths
• Installation resources point to storage locations that no longer exist
Understanding this helps you fix the real issue: restoring a valid drive path so QuickBooks can install without interruption.
Primary Causes of QuickBooks Error 1327
QuickBooks Error 1327 is almost always triggered by broken or incorrect drive references during installation. When Windows can’t locate the drive that the QuickBooks installer is trying to use, the setup process stops and shows the “Invalid Drive” message.
This section breaks down the main technical reasons behind this issue—so you can quickly understand what’s going wrong on your system and choose the right fix.
1. Invalid or Inaccessible Drive Letter in the Installation Path
One of the most common causes of Error 1327 is a drive letter that no longer exists or is temporarily disconnected.
You’ll run into this if:
• The installer is pointing to a drive that was renamed or removed
• A mapped network drive is offline
• An external drive was unplugged during installation
QuickBooks needs uninterrupted access to the drive path. Once that path breaks, the installer immediately fails.
2. Corrupted or Modified Registry Drive Paths
The Windows registry stores the drive locations used by your system and applications. If any of these entries contain outdated or incorrect drive letters, the QuickBooks installer reads the wrong path and triggers Error 1327.
This usually happens when:
• A drive letter was changed manually
• An old installation left behind invalid registry paths
• System cleanup tools modified Shell Folder entries
Because the installer relies on these registry values, even a single incorrect drive letter can cause the installation to fail.
3. Faulty or Unstable Storage Devices (USB or External Drives)
If you’re installing QuickBooks from an external storage device, Error 1327 may appear when the connection becomes unstable.
A weak USB port, a loose cable, or a temporary interruption can break the installation path.
In simple terms, if the storage device disconnects for even a moment, the installer loses access to the drive—resulting in the “Invalid Drive” error.
4. Microsoft .NET Framework Malfunction
QuickBooks uses several Microsoft components during installation, including the .NET Framework. If .NET is damaged or missing required files, the installer may fail to access or validate system paths.
This can lead to:
• Incorrect drive references during setup
• Failure to load installation dependencies
• Sudden path-access errors mid-installation
Repairing .NET often restores the components needed for QuickBooks to install correctly.
5. System-Specific Configuration Issues
In some cases, the issue comes from your Windows environment rather than the drive itself. For example:
• A Windows user profile does not have the required permissions
• System policies restrict access to shell folders
• User accounts lack registry write permissions needed during installation
These configuration issues can cause QuickBooks to misread or reject installation paths, leading to repeated Error 1327 messages.
If you understand which of these applies to your system, you can target the exact cause instead of guessing—and resolve QuickBooks Error 1327 much faster.

Symptoms to Identify QuickBooks Error 1327
When QuickBooks Error 1327 appears, it usually shows up at the same point every time you try to install the software. If you’re experiencing this error right now, you’ll probably notice a few clear signs that the installer can’t reach the drive it needs. Here’s what you’ll typically see:
1. “Invalid Drive” Message During Installation
The most obvious symptom is the pop-up message saying “Invalid Drive” or “The drive is invalid.”
This is QuickBooks’ way of telling you that the installation path isn’t accessible anymore.
2. Installation Freezes or Slows Down at the Same Step
You might notice the setup getting stuck every time it reaches a specific stage—usually when it tries to read or write files to a drive that Windows can’t detect.
The installer may:
• Pause for a long time
• Freeze halfway through
• Close unexpectedly
All of these are early signs that the drive path isn’t valid.
3. Installer Cannot Locate the Referenced Directory
If QuickBooks is trying to install to a folder on a missing, renamed, or disconnected drive, you’ll see repeated failures when accessing that directory.
This can happen with local drives, network drives, or external storage devices.
4. QuickBooks Setup Fails Repeatedly at the Same Point
If every attempt to reinstall QuickBooks stops in the exact same place, it’s almost always a drive-path problem.
This repetition is a key indicator of Error 1327 because the installer keeps hitting the same invalid location every time.
When These Symptoms Match Your Situation…
If you’re seeing one—or several—of these signs, it’s very likely that the QuickBooks installation is pointing to a drive that doesn’t exist, isn’t connected, or has an incorrect letter assigned to it.
The good news? Once you correct the drive path, the error usually clears instantly.
Fix QuickBooks Error Code 1327: Invalid Drive Installation
Fix QuickBooks Error 1327 by checking device connections, repairing .NET Framework, and adjusting registry settings. These common solutions can often resolve the issue. For detailed information follow the below steps:
Solution 1: Make sure the Proper Connection Of Storage Devices
Make sure that every one of the cables and other items is connected to the PC properly. Also, ensure that the USB or Flash devices that you are using to put in QuickBooks are perfectly connected and functioning.
Solution 2: Configure Microsoft .Net Framework
Follow these steps to Repair the Microsoft .NET Framework:
Step 1: Firstly, go to Programs in the Control Panel.
Step 2: After that, click the option of Turn Windows Features On/Off.
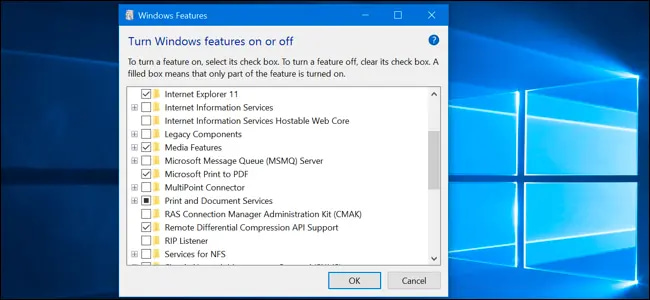
Step 3: When asked, fill in all the credentials.
Step 4: Next to Microsoft .NET Framework, there is a checkbox. Uncheck it and restart the pc.
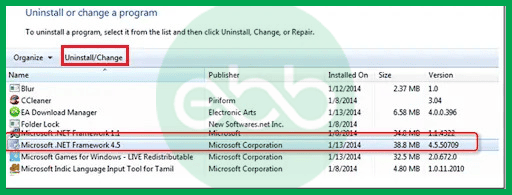
Step 5: Finally, open programs, and follow the same steps again. It means that the user has to check the box next to the NET framework again.
Solution 3: Repair Registry Settings
Below, we have mentioned steps to repair the registry settings.
Step 1: Firstly, back up the system registry.
Step 2: After that, press Windows +R keys simultaneously. After that, type Regedit, and click the run option.
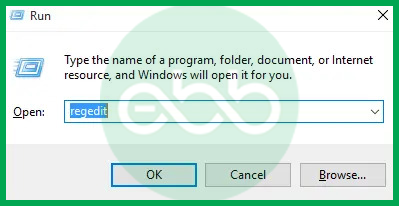
Step 3: Follow this path: HKEY_CURRENT_USER\Software\Microsoft\CurrentVersion\Explorer\Shell Folders.
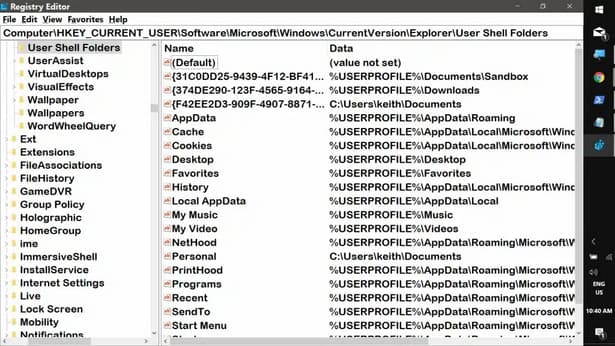
Step 4: Look for the entries that list the drive letter. It must be mentioned in the error message.
Step 5: Also, modify the wrong drive names to C drive.
Step 6: Finally, save the settings. After that, restart the system and try reinstalling the application.
Step 7: Once the installation is complete, change the adjustments made to the registry back to its original form.
Solution 4: Create a new Windows user and install Windows
Creating a new Windows user can help you to fix the issue. The steps are different for each version:
On Windows 10
Step 1: Hit the Start tab.
Step 2: Select Settings and click on Accounts.
Step 3: Choose Family and Other Users.
Step 4: Now, select Add someone else to this PC.
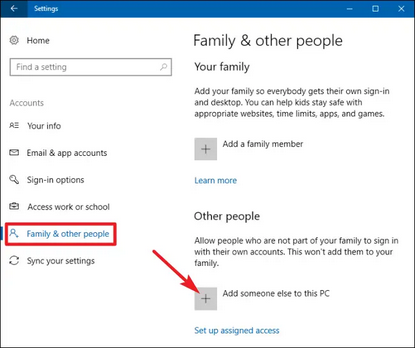
Step 5: Enter a new password, name, password hint.
Step 6: Press the Next button.
On Windows 7 or 8
Step 1: Hit the Start tab and then select the Control Panel.
Step 2: Go for the User Accounts and then choose Manage Another Account.
Step 3: Create a new account.
Step 4: Provide it a unique name and click on Admin.
Step 5: Select Create account option and reboot your system.
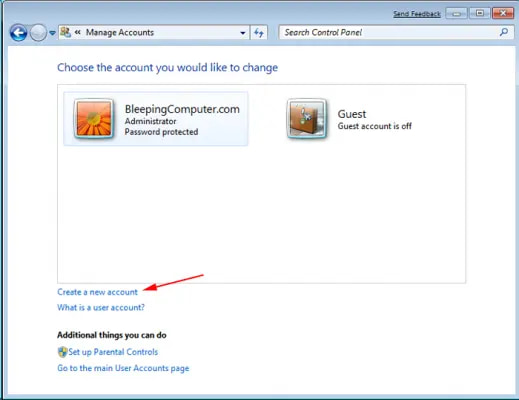
Step 6: Log into your computer with admin credentials and try to install again.
Solution 5: Re-connect the Network Drive
Step 1: Hit the Start icon and then select Programs.
Step 2: Choose the Windows Explorer option.
Step 3: Navigate to the Network drive on which the shell folder is available and click OK.
Step 4: Select the Map network drive from the tool menu.
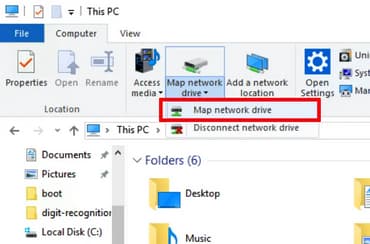
Step 5: Make sure the shell folder unchecks, Reconnect at sign-in and write the path.
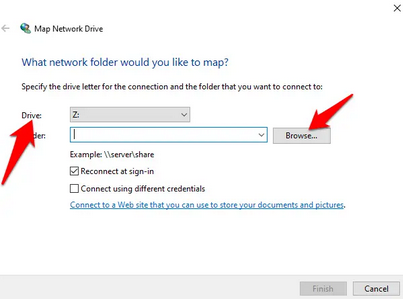
Step 6: Press OK
Step 7: Restart Windows and install the applications.
Solution 6: Install QuickBooks when not connected to the Network
For Windows 10
Step 1: Press Windows + R keys on your keyboard.
Step 2: Open the Run window and hit the Control Panel.
Step 3: Navigate to the drop-down arrow and select View by and small icons.
Step 4: Open the Network and Sharing Center and choose to Change Adapter Settings from the left pane.
Step 5: Hit right-click on every adapter and click on Disable.
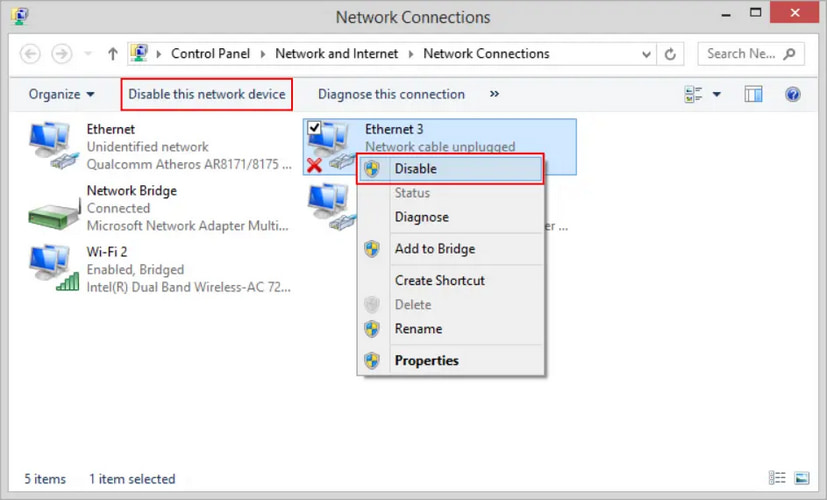
Step 6: “The connection is lost” message will appear on your screen, ignore it.
Step 7: Make sure you do not reconnect with your network after getting this error message.
Step 8: Leave the tab open and try re-installing QuickBooks.
Step 9: Go back to the network connections window and now activate your network connections.
For Windows 7,8
Step 1: Hit the Windows Start icon and click on Control Panel.
Step 2: Select View by >Small icons from the drop-down menu.
Step 3: Go to the Network and Sharing Center and then choose to Change Adapter Settings in the left pane.
Step 4: Click right on every adapter and disable all of them.
Step 5: The Connection is lost error message will be displayed on your screen but ignore it.
Step 6: Make sure you do not reconnect the network after getting this error prompt.
Step 7: Leave the window open and try to install QuickBooks again.
Step 8: Return to this screen and enable the network connections once the installation is completed.
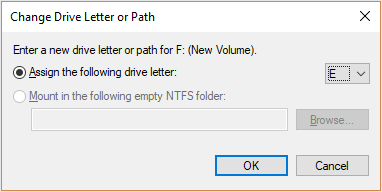
Solution 7: Change the Drive letter Designation
Assigning letters to drives simplifies the process of locating and managing files. You just need to remember a simple letter instead of remembering the complex device paths. This method is especially user-friendly for non-technical users as it helps you to identify and access different storage devices like hard drives. Below are the steps to do so:
- Step: Hold and press Windows + X keys and choose Disk Management from the menu.
- Step: Locate the hard drive you want to change the letter designation for. It will be listed in the bottom half of the Disk Management window.
- Step: Hit right-click on the hard drive you want to change the letter for, and then select the option Change Drive Letter and Paths.
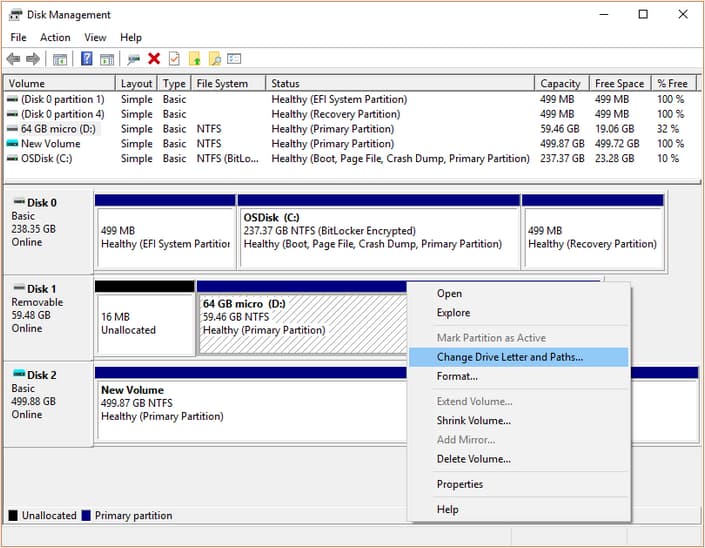
- Step: Click Change to change the drive letter.
- Step: If the drive doesn’t already have one, press Add.
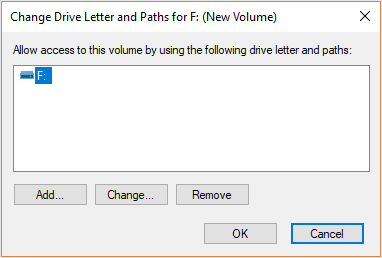
- Step: Opt for the new drive letter from the drop-down menu.
- Step: Hit the OK tab to save the changes.
- Step: Press Yes if you’re prompted to get a warning message about programs that may rely on the drive letter might not run correctly.
Long-Term Prevention Tips for Avoiding QuickBooks Error 1327
QuickBooks Error 1327 often comes back when drive paths or system settings change without you realizing it. The good news is that a few simple habits can prevent this installation error from ever repeating. If you’ve already fixed the issue, the tips below will help you keep your system stable and installation-ready in the long run.
1. Keep Drive Letters Fixed and Documented
Most installation failures happen because a drive letter is changed or removed.
To avoid that, try to:
• Keep your main installation drive (usually C:) unchanged
• Avoid reassigning drive letters unless absolutely necessary
• Write down or document any custom drive paths used in your setup
This makes future installations smoother and helps you quickly spot when a drive reference has changed.
2. Maintain a Clean Registry and Avoid Unauthorized Modifications
Registry entries control where Windows stores system folders and installation locations. If those entries get modified—by cleanup tools, system migrations, or accidental edits—the QuickBooks installer may read the wrong drive.
To prevent this:
• Avoid using aggressive “registry cleaning” software
• Do not manually edit registry paths unless you’re confident
• Back up the registry before making changes
• Keep your Windows user environment organized and stable
A clean registry means fewer path-related interruptions during QuickBooks installation.
3. Ensure External Devices Stay Connected During Installations
If you install apps from a USB drive or external storage, small connection drops can trigger Error 1327 instantly. To avoid this:
• Don’t unplug or move external devices during installation
• Use stable USB ports instead of loose or worn ones
• Keep network storage connected if the installer uses a mapped drive
Consistency is key—the installer needs uninterrupted access from start to finish.
4. Use Stable Administrator Accounts for All Installations
Installing QuickBooks from a guest account or a restricted profile can cause permission issues, incorrect drive mappings, and registry write failures.
For every installation:
• Log in using an Administrator account
• Make sure the profile has full access to system directories
• Avoid switching between accounts during the installation process
A stable profile ensures Windows can validate drive paths correctly and prevents disruptions during setup.
In short…If you keep your drive letters consistent, protect your registry, maintain stable device connections, and use the right Windows account, you dramatically reduce the chances of seeing QuickBooks Error 1327 again. These small habits go a long way in keeping installations smooth and reliable.
Wrapping Up!
QuickBooks Error 1327 can feel frustrating, especially when it stops your installation right in the middle of an important setup. But once you understand what causes it—a broken or invalid drive path—it becomes much easier to fix. Restoring the correct drive reference, repairing the registry entries, and making sure your installation paths are stable usually resolves the issue completely.
As you move forward, it’s a good idea to double-check your drive letters, confirm that your storage devices are connected properly, and keep your Windows environment clean and consistent before installing QuickBooks or any other software. A few quick checks can save you from running into the same interruption again. In case you cannot fix QuickBooks Error 1327 or are unable to understand the issue, reach out to QB Error Support contact number USA +1-802-778-9005 for immediate support.
Frequently Asked Questions
Will Error C=1327 damage my actual QuickBooks Company Data (.QBW) files?
No, Error C=1327 is strictly an installation and configuration error, not a data corruption error. It occurs when the Windows Installer attempts to locate a specific drive path (like a network drive or USB) to write temporary installation files or verify paths, but cannot find it.
Note: According to Intuit and Microsoft documentation, this error halts the execution of the installation wizard, meaning it does not touch or alter your existing Company Files stored on your hard drive or server. Your financial data remains safe while you resolve the drive mapping issue.
Why does the QuickBooks installer look for a drive I disconnected months ago?
This happens because Windows keeps a “memory” of where your personal folders (like My Documents, Pictures, or Downloads) are located via Registry Keys.
➜The Technical Reason: If you previously pointed your “My Documents” folder to an external hard drive (e.g., Drive E:) to save space, and then removed that drive, the Windows Registry still lists “Drive E:” as the home for your documents.
➜The Result: When QuickBooks installs, it queries Windows: “Where should I put the user documentation?” Windows replies: “Drive E:”. When the installer cannot find Drive E, it triggers Error C=1327.
Why does this error appear even if I am logged in as the Administrator?
Being an Administrator does not bypass the Windows Registry’s configuration of “Shell Folders.” Even the Administrator account has a profile that maps system folders (Desktop, Documents, etc.) to specific locations.
If the Administrator profile was configured to point to a network drive that is currently offline, the Administrator will receive the C=1327 error just like a standard user. The error is about path availability, not user permissions.
Is it safe to change or reassign drive letters in Windows to fix this error?
Yes, but with caution. You can use Disk Management in Windows to change a drive letter so that it matches what QuickBooks expects.
Risks: Changing drive letters can break links for other installed applications. Always back up important data before making changes.
If I reinstall QuickBooks after fixing Error C=1327, do I need to worry about my company data?
Generally, reinstalling QuickBooks (especially via a clean install) does not delete your company file but it’s always best practice to backup your QuickBooks data before uninstalling or reinstalling.
Also, if the drive issue was due to a mapping or drive letter change, ensure your company files are stored on a stable, accessible location (local drive or properly mapped network drive).
