Highlights (Key Facts & Solutions)
- Two Core Workflows: QuickBooks offers two ways to record payments:
- Write Checks: Used for immediate cash payments or expenses when no formal bill is tracked.
- Enter Bills, then Pay Bills: The recommended method for tracking vendor liabilities (Accounts Payable) before the payment is issued.
- Printer Setup is Key: Before printing, the user must set up the printer by going to the File menu and selecting Printer Setup to adjust the alignment and select the correct form style (Voucher, Standard, or Wallet).
- Alignment Adjustment: Misalignment is corrected by using the Alignment Grid in Printer Setup, allowing users to adjust placement in increments of 1/100th of an inch.
- Batch Printing: To print multiple checks marked “Print Later,” the user must access the Select Checks to Print window and verify that the First Check Number matches the physical check loaded in the printer to prevent numbering errors.
- Critical Requirement: Users must use QuickBooks compatible check stock (not standard paper) to ensure bank processability and correct alignment with QuickBooks templates.
- Accounting Best Practice: If a check is printed with an error, the user must Void Check (under the Edit menu) to maintain the transaction’s history and audit trail, rather than deleting it entirely.
- Check Types: QuickBooks supports printing three check styles: Voucher Checks (with stubs), Standard Checks (three per page), and Wallet Checks.
Overview
Unable to Print checks in QuickBooks desktop according to your needs or preferences? If yes, this blog is for you, so stay tuned until you find the right solution. QuickBooks is a robust accounting software introduced by Intuit for all small or mid-sized businesses. It allows you to keep track of income, expenses, and accounts receivable and payable, as well as enables you to monitor overall accounting activity.
QuickBooks is a versatile software that allows you to write and print checks directly from the software.
In addition to it, the users can pay vendors, employees, or other general expenses and print a single check or multiple checks based on their requirements.
QuickBooks offers two ways to manage your bills and bill payments: Write Checks and Enter Bills.
Write Checks
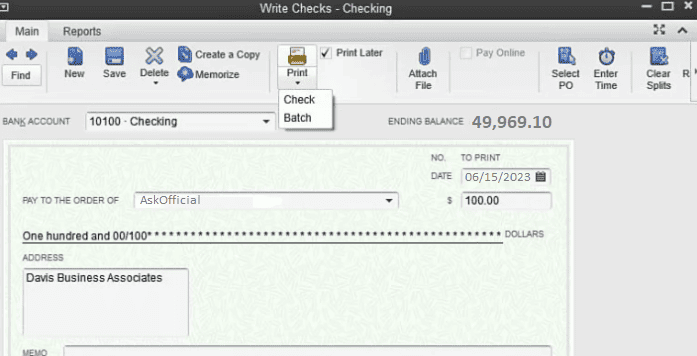
“Write Checks” is the most convenient way to Register Payments. It must be used when you want to pay bills, when you receive them, or when no bill is accepted.
Enter Bills
“Enter Bills” is a recommended way to include bills in QuickBooks used to record transactions that are to be paid at a future date, including expenses incurred, materials purchased, or services provided by a vendor. This way, you can keep track of all your accounts payables and know what or when a bill needs to be paid.

Why Do You Need to Print Checks in QuickBooks Desktop?
QuickBooks Desktop comes with various features that streamline your check printing process.
It enables you to:
- Print one check at a time or multiple checks in one single batch.
- Save a check to print later.
- Print different kinds of checks.
After printing checks directly from QuickBooks Desktop, the payee details are completed automatically from your vendor contact information. The amount is also finalized for the bills that have already been registered. You can pay multiple bills at once with the same check.
How to Print Checks in QuickBooks Desktop?
Below are the methods you need to implement for printing checks in QuickBooks Desktop; let’s get started.
Here’s How to Print Checks When Bills are Received in QuickBooks Desktop:
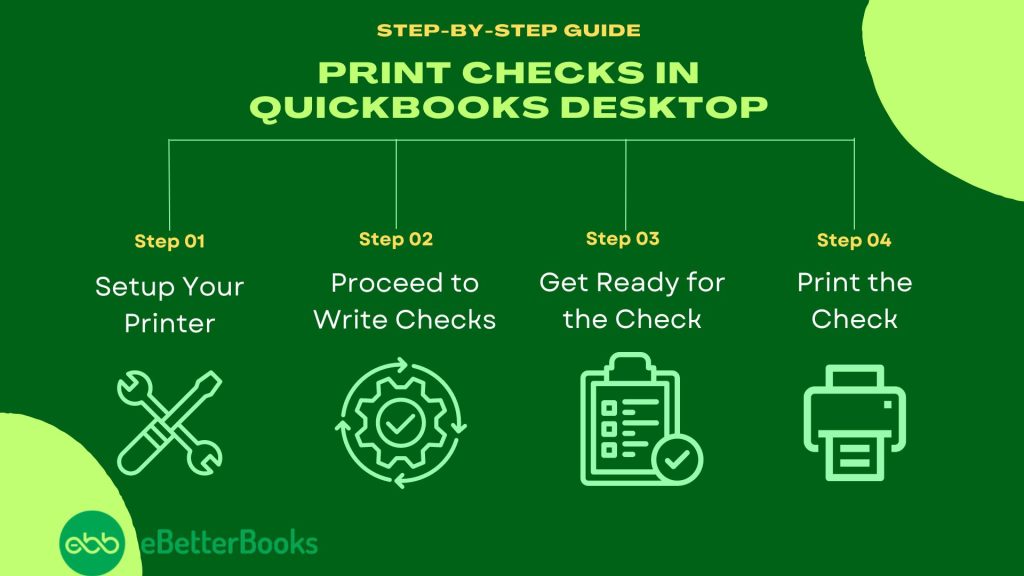
Method 1: Setup Your Printer
Before Printing your checks, ensure your printer is properly set up in the QuickBooks Desktop.
To set up your printer, do the following:
- First of all, choose Printer Setup under the File menu.
- Now, click the Check/PayCheck from the Form Name drop-down list.
- Select Voucher for the check style.
- After this, press Align, click on Print, change the horizontal and vertical settings, then hit the OK tab.
- Opt for Print Sample.
- At last, select Align once again and print another sample if you need to make additional modifications.
Method 2: Proceed to Write Checks
- At the top of your dashboard, go to the Banking menu.
- Next, click on Write Checks under the drop-down list.
- Also, you can select Write Checks in the Banking section of your home page.
Method 3: Get Ready for the Check
QuickBooks Desktop will now start showing the Write Checks window.
To prepare your check, you need to provide the required details on QuickBooks Desktop, which includes:
- Items or Expenses tab: Assign the check to a specific QuickBooks Accounts or Items tab, and you can also allocate the check to more than one QuickBooks Account, similar to how a bill is added.
- Print Later: Verify this box if you wish to create the Check Now but print as an integrated part of a batch after a while. When you check this box, you can replace the check number provided on the check preview with the message to print.
- Bank Account: Select the particular bank account from which the money will be deducted.
- Address: This section is automatically populated based on the details entered during the payee setup.
- Date: Write down the date when you are going to issue the check.
- Pay to the Order of: Type the Payee Name and the address information will be automatically completed.
- Number: If you’re printing the check now, add the number from the check you will place in the printer. If the Print Later is checked, then there will be the option to print.
- Amount: Enter the amount as well.
- Memo: This field is not mandatory, but you can use it to provide additional information, such as the account number and the purpose of the payment.
And lastly, hit the Save icon at the top of the Write Checks screen, but wait to close the window.
Method 4: Print the Check
Now, it’s easier to print checks individually or print multiple checks simultaneously. You need to hit the drop-down menu from the Print icon located at the top of the Write Checks window to select.
Below are the steps to print checks one at a time or perform batch printing; let’s have a look:
- From the Write Checks window, select the Print icon, then select:
- Select the Cheque option to print single check.
- Enter the Printed Check Number when prompted.
- Follow the on-screen instructions to complete the printing process.
Batch: To print multiple checks you marked for Print Later. When you choose this option, you will be redirected to the Select Checks to Print window. You just have to click on your printer and put a checkmark on the check(s) you want to print, then select OK.
Batch Printing
Once you are done with preparing a check, click Save & New, then repeat the same process to create all the required checks. Make sure that all checks have the Print Later box placed at the top of the Write Checks window. Select the drop-down menu in the print icon from the final check and click Batch.
The Select Checks to Print screen will start displaying all checks that have been created but not printed yet.
- Initially, select the bank account from which the checks will be written.
- Now, click on the box beside the check to tick Mark the checks you need to print.
- Type the check number from your first blank check inserted in the printer under the First Check Number field, then press OK.
In the Print Checks window:
- Open the Print Checks window.
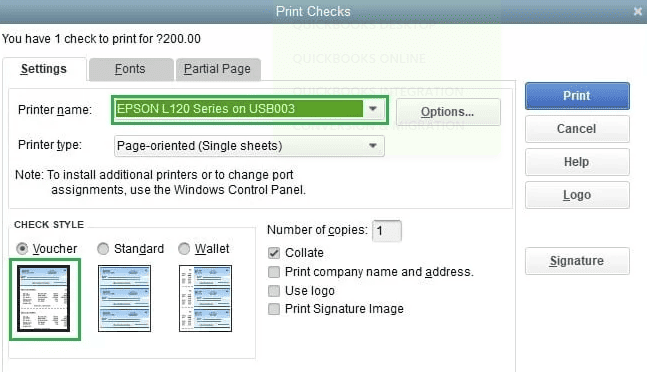
- Choose the Printer name and Printer type.
- In the Check Style section, select whether to print as Voucher, Standard, or Wallet.
- If your pre-printed checks already include your company name and address, uncheck the box for Print company name and address.
- Verify that all other settings are correct.
- Click Print to finish.
how to adjust check printing alignment in quickBooks desktop?
You can easily adjust the position of the printed text on your checks using the Alignment Grid. This lets you fine-tune the horizontal and vertical placement to make sure everything lines up perfectly. Additionally, you’ll have to select Voucher (8 1/2″ x 11″) as the check style to ensure that the check will align with the envelope.
Here’s how you can do it:
- Go to the File menu and choose Printer Setup.
- Select Check/Paycheck from the Form Name drop-down.
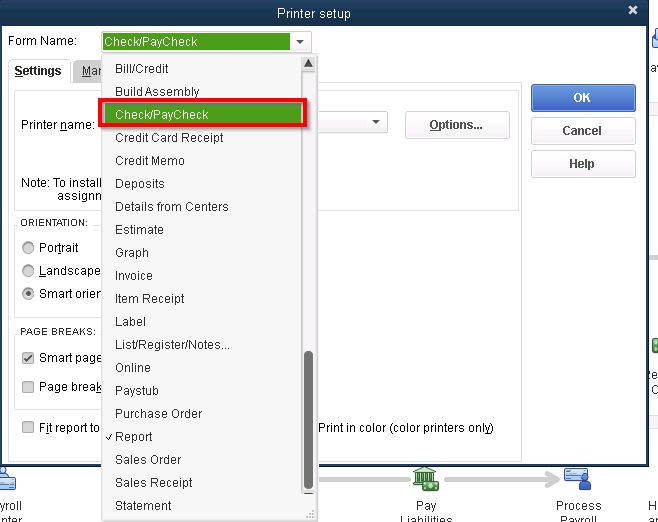
- Pick Voucher as the check style.
- Click Align and print a sample check.
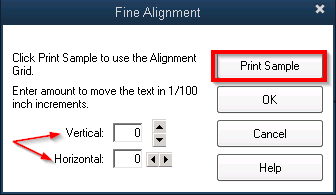
- Compare the sample to your checks and adjust the alignment using the grid.
- Print more samples and tweak the settings until everything lines up just right.
Here’s How to Write & Print Checks for Bills Already Entered in QuickBooks Desktop?
Method 1: Select Pay Bills
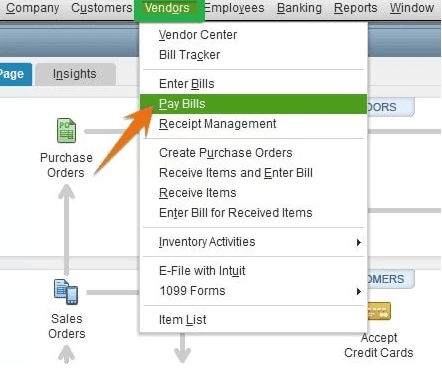
In the Vendors menu on your QuickBooks Desktop home page, choose Pay Bills, as shown below.
Method 2: Opt for the Bills You Want to Pay
A screen displaying the list of bills already entered in the QuickBooks Desktop will show up. Herein, hit the checkbox on the left side to choose the bill or bills you must pay.
Method 3: Prepare the Check
To create the check in QuickBooks Desktop, you are supposed to add the required information described below:
- Account: Select the checking account from where you must pay off the checks.
- Payment Date: Enter the date you want to prepare the check.
- Method: Click on check under the drop-down menu.
- Check Number: You can allocate a check number or click To be Printed. However, if you choose To be Printed, the check number is allocated automatically when the check is printed.
You must hit on the Pay Selected Bills option to create the checks.
Method 4: Print Checks or Pay Additional Bills
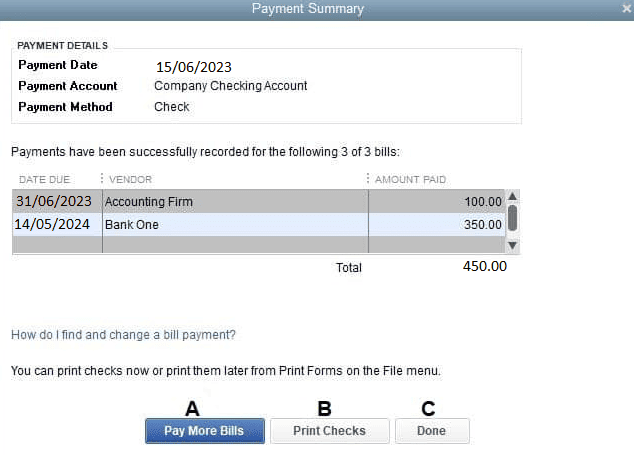
After hitting the Pay Selected Bills option, QuickBooks will show a payment summary.
You will be able to:
- Pay Extra Bills: Press here to create checks to clear additional bills.
- Print Checks: If you’d like to print your checks, click the Print Checks option.
- Done: If you want to print the checks later, hit the Done tab.
Method 5: Locate the Unprinted Checks
To find the unprinted checks later on, select Print Checks under the Banking section of your home page.
Method 6: Print the Check
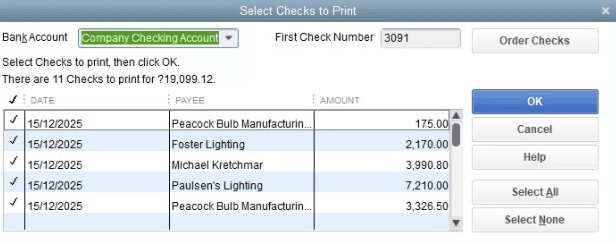
- When you click Print Checks, the list of unprinted checks window starts popping up.
- You must select the checks you wish to print and then press OK.
- Ensure that the number available in the First Check Number field equals the number of the first check lined up in your printer.
- As listed in the above section, the final step is to select the check style, click on your printer, and then hit Print.
what type of checks can be printed on QuickBooks and how to do it?
QuickBooks Desktop supports three types of checks (Voucher Checks, Standard Checks, Wallet Checks):
- Voucher Checks: Voucher checks have attached vouchers that provide detailed transaction information, making them ideal for payroll and recordkeeping. These checks work seamlessly with QuickBooks on laser printers, saving time and ensuring accuracy.
- Standard Checks: Standard checks come three per page and are perfect for paying vendors or bills in large batches. They are compatible with most printers and can be customized with your logo, offering a professional look for your business.
- Wallet Checks: Wallet checks are smaller (6″ x 2.625″) and designed to fit in a wallet, making them convenient for unexpected payments or when portability is key.
To print checks in QuickBooks Desktop, simply select the type of check, customize the print settings, and print using your preferred printer.
Writing a Check in QuickBooks Desktop
Regular Checks
Regular checks are commonly used in QuickBooks Desktop to cover a range of expenses, including:
- Fixed assets
- Inventory and non-inventory part costs
- Services
- Additional fees
- Other tracked expenses
They can also be utilized to pay credit card debts or deposit funds into a petty cash account. To initiate writing a check, navigate to the Banking menu and select Write Checks.
Required Fields for Writing a Check
When writing a check, you will need to fill out several key fields:
- Bank Account: Select the bank account from which funds will be deducted.
- Ending Balance: This displays the balance of the selected bank account as of the check-writing date.
- Pay to the Order of: Enter the payee’s name or the individual for whom the check is issued.
- Number: The check number is assigned based on your preferences set in QuickBooks.
- Date: Use the date when the check is issued.
- Amount: Enter the amount in dollars; the dollar amount will automatically appear in words beneath the payee’s name.
- Address: The payee’s address will auto-fill based on prior setup.
- Memo: This field can be left blank but is often used for additional notes regarding payment details.
- Print Later or Pay Online: Check either box depending on whether you want to print the check later or complete the payment online.
- Purchases or Bills Tab: This tab is for entering shipping costs and obligations not linked to any QuickBooks transaction.
- Expense Tab: This is for general expenses not associated with any items in QuickBooks.
- Item Tab: To select appropriate items from a drop-down list.
- Save & Close: After filling in all required fields, click on Save & Close.
Other Types of Checks
In addition to regular checks, QuickBooks Desktop allows for other types of checks:
- Bill Payment Checks: These are automatically generated when selecting the Pay Bills option.
- Sales Tax Checks: Created to settle sales tax liabilities.
- Paychecks: Issued to employees as part of their wages or earnings.
- Payroll Liability Checks: Used to settle outstanding payroll-related balances, including withheld payroll taxes and employee contributions (e.g., 401(k), health insurance).
How to Change Check Printing Settings in QuickBooks Desktop?
- Go to the File menu and select Printer Setup.
- In the Form Name drop-down, choose Check/Paycheck.
- Adjust the Check Style (Voucher, Standard, or Wallet) based on your preference.
- If needed, adjust other settings such as Printer name or alignment.
- Click OK to save your changes.
How to Print the Check Register in QuickBooks Desktop?
- Go to the Edit menu and select Use Register.
- Choose your account from the drop-down menu and click OK.
- Click the Print icon at the top of the register.
- Specify the date range for printing.
- If you want to include split details, check the box for Print splits detail.
- Click OK, then select Print to complete the process.
How to Void a Blank Check in QuickBooks Desktop?
To void a blank check in QuickBooks follow the below steps:
- Create a new check with an amount of $0.00.
- Enter a payee name and assign an account in the Expenses section.
- Go to the Edit menu and select Void Check.
Final Words!
QuickBooks Desktop provides a convenient means for writing and printing out checks for your business. Writing, printing, and even repaying bills, reimbursing employees, or maintaining accounts payable with vendors just gets easier. With the basic setup steps provided in the instructions, you can effortlessly configure your printer, make out checks, and then print them one at a time or in batches.
But if you still facing any kind of issues with your software and need professional assistance, regarding accounting, bookkeeping & accounting software-related issues then feel free to get in touch with us at +1-802-778-9005, or you can mail us at: support@ebetterbooks.com.
Frequently Asked Questions
1. What is the core accounting difference between using “Write Checks” and the “Enter Bills” workflow?
The difference lies in how QuickBooks tracks the liability and affects the Accounts Payable (A/P) register.
- Write Checks: This method records a payment that is made immediately (cash or check payment).
- Impact: The transaction instantly reduces the Bank account balance. No entry is made to the Accounts Payable register.
- Enter Bills & Pay Bills: This is the correct workflow for tracking future obligations (Accounts Payable).
- Impact: Entering the bill initially increases the A/P liability. The subsequent Pay Bills action creates the check, which then reduces the A/P liability and the Bank account balance. This two-step process is crucial for accurate vendor balances and A/P reporting .
2. My check numbers print in reverse order during a batch print. How do I fix this setting in QuickBooks Desktop?
This is a frequent issue where QuickBooks or the printer driver is set to print the last page first. The primary fix is to adjust the page order settings within QuickBooks.
The steps are:
- Go to the File menu, then select Printer Setup.
- In the Form Name drop-down menu, select Check/PayCheck.
- Click Options (the exact location may vary, sometimes requiring a click on Printer Setup first).
- In the Page order drop-down menu, select Front to back (or the ascending order option).
If this does not resolve the issue, the print order setting must be adjusted manually within your physical printer’s Printing Preferences (or Properties) outside of QuickBooks.
3. The printed text on my checks is misaligned. How does the alignment grid work, and what is the key adjustment increment?
Misalignment is often caused by scaling or margin settings. QuickBooks uses a built-in alignment tool for precise adjustments.
- Access: You navigate to File > Printer Setup, select the check form, and click Align.
- Grid Function: This opens a grid that allows you to make minute adjustments to the text placement.
- Key Adjustment Increment: You adjust the horizontal and vertical settings in increments of 1/100th of an inch until the printed sample matches the preprinted check stock. Printing samples on plain paper before using actual checks is recommended to avoid waste.
4. What is the most critical item I must have to successfully print checks that is often overlooked?
The most critical item overlooked by new users is the requirement to use QuickBooks compatible check stock.
- Requirement: You cannot print valid, bank-processable checks on standard blank printer paper. The paper must be specific check stock (Voucher, Standard, or Wallet) designed to align precisely with QuickBooks templates.
- Security and Compatibility: This check stock includes necessary security features (microprinting, watermarks) and is the only paper guaranteed to work with the software’s printing layouts, preventing common alignment failures.
5. If I made a mistake on a check after printing, should I delete it or void it in QuickBooks Desktop?
The mandatory accounting best practice is to Void the check, not delete it.
- Void Check: This sets the check’s monetary amount to $0.00 but keeps the transaction visible in the register with its original date and check number.
- Why Void? Voiding preserves the audit trail, documenting that the physical check number was issued and later canceled. This is essential for accurate bank reconciliation, compliance, and tax purposes.
- Delete Check: This removes the transaction entirely from the register, breaking the sequence of check numbers and compromising the audit trail, making future reconciliation and audits difficult.
6. The article mentions “Bill Payment Checks.” Are these the same as “Regular Checks” in QuickBooks Desktop?
No, they are distinct transaction types used for different accounting purposes.
- Regular Checks: These are created manually using the Write Checks function (
Banking > Write Checks). They are used for immediate payments (e.g., funding petty cash, immediate expense payment) not previously recorded as a bill. - Bill Payment Checks: These are automatically generated when a user selects the Pay Bills function (
Vendors > Pay Bills). They serve as the specific check form used to reduce a recorded liability (Accounts Payable) after a bill has been entered.
7. How do I print the Check Register in QuickBooks to review my printed and voided checks and track the sequence?
Printing the Check Register provides a crucial physical or digital report of all transactions in a specific bank account, which is ideal for sequence tracking and reconciliation.
The steps are:
- Go to the Edit menu and select Use Register.
- Choose the bank account from the drop-down menu and click OK.
- Select the Print icon at the top of the register.
- Specify the required date range.
- Optional: Check the box for Print splits detail if you need the transaction breakdown.
- Click OK, then select Print.
Disclaimer: The information outlined above for “How to Write and Print Checks for Bills Already Entered in QuickBooks Desktop?” is applicable to all supported versions, including QuickBooks Desktop Pro, Premier, Accountant, and Enterprise. It is designed to work with operating systems such as Windows 7, 10, and 11, as well as macOS.
