
Hi, this is Don Giorgio. I’ve been using QuickBooks Desktop Enterprise 2024 to handle accounting for my business, and something odd has started happening with journal entries that’s becoming a real concern.
Normally, when I create a new journal entry, QuickBooks automatically assigns a reference number in sequence JE-1021, JE-1022, and so on. But now, when I go to enter a journal entry, the “Entry No.” field is blank. It’s not auto-generating anything. I have to manually enter the number every time, which opens the door for duplicates or skipped numbers without any warning.
Even more concerning, I noticed that the system is letting me go back and edit previously finalized journal entries something that should be restricted based on my current settings. These are entries that should be locked down for audit purposes, yet I’m able to overwrite them without any alerts or permissions.
This is becoming a compliance and workflow risk. I rely on QuickBooks to maintain internal control over transaction tracking, and this issue is throwing off the reliability of my general ledger. I’ve already had a near miss where one of my team members accidentally reused a journal number, and we almost posted incorrect reports for month-end closing.
I urgently need a fix or guidance on how to reset the numbering automation and lock down historical journal entries like before. This isn’t just an inconvenience it’s a risk to my financial reporting accuracy.
Hi Don Giorgio,
Thank you for reaching out and I truly understand how frustrating and concerning this situation must be. When a system you rely on for accuracy and control begins to behave unpredictably, especially with something as critical as journal entries, it can disrupt your reports, your workflow, and even affect compliance.
From what you’ve described, you’ve been using QuickBooks Desktop Enterprise 2024 effectively to manage your accounting, with journal entries auto-numbering in sequence (JE-1021, JE-1022, etc.). Now, the “Entry No.” field appears blank, forcing you to enter numbers manually and increasing the risk of duplicates or skipped entries, which can compromise the integrity of your financial records.
More concerning is the ability to edit previously finalized journal entries without any warnings or restrictions, despite having the correct settings in place. This weakens internal controls, especially when it comes to audit readiness and accurate reporting. As you’ve already experienced, a near-miss during month-end close is a clear red flag that this needs immediate attention..
The good news? There are clear steps you can take to restore auto-numbering and lock historical entries, aligning your QuickBooks setup with best practices. Whether it’s adjusting accounting preferences, resetting the number sequence, or enabling closing date protections, I’ll walk you through it to keep your records secure, accurate, audit-ready and fully under control.
Journal entry auto-numbering and entry lock features in QuickBooks Desktop Enterprise 2024 may stop working due to incorrect settings, user permission changes, file corruption, or system updates. Common causes include disabled auto-numbering, missing closing date or password, assigning broad user role permissions, and damaged company files. Identifying the specific cause will help restore proper controls and prevent future errors.
Restoring auto-numbering and locking down past journal entries in QuickBooks Desktop Enterprise 2024 helps maintain accurate records and prevents unintended changes to historical data. The steps below outline how to check your accounting preferences, user roles, and closing date settings to re-enable these controls.
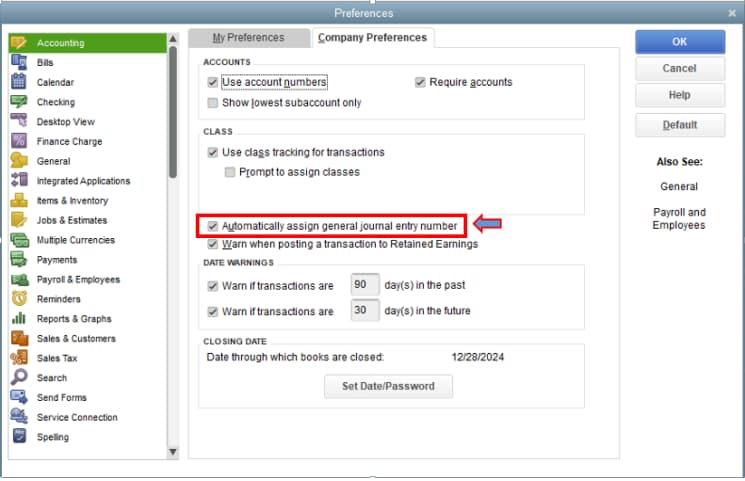
QuickBooks Desktop gives users the flexibility to turn off automatic journal entry numbering. Before proceeding, ensure the “Automatically assign general journal entry number” option is turned off in your Preferences.
Now, you will be able to create journal entries without the sequence number.
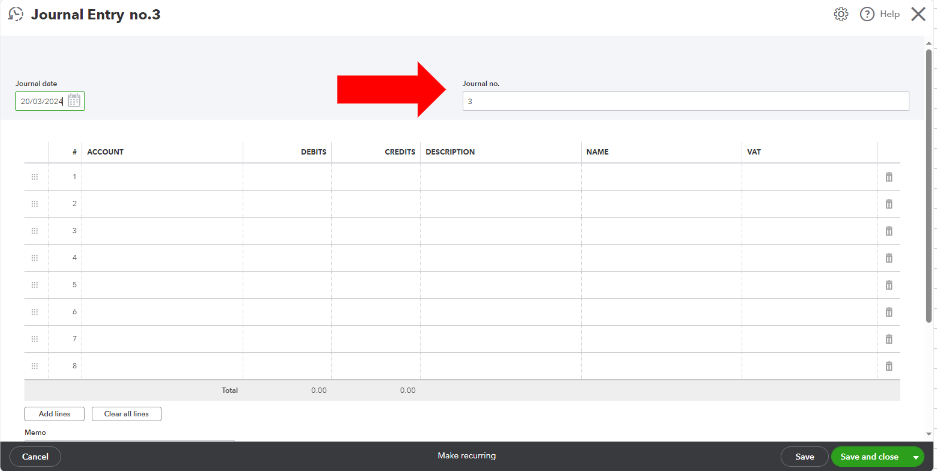
If you want to start a new sequence for your journal entry numbers or correct an existing one, follow these manual steps:
Setting a closing date and password helps to protect your financial data from unintentional changes. By locking down previous periods, you can prevent users from editing or deleting historical transactions, including journal entries. This ensures accuracy and compliance, especially during audits or reconciliations.
Note: If you void a check dated before the closing date with an expense account, you’ll get this message:
Select Yes to allow QuickBooks to automatically create two journal entries that balance the accounts impacted by the voided check. Creating these entries is optional. You can still proceed to void the check without them, if preferred.
Assigning specific roles and permissions ensures that only authorized users can view, create, or modify journal entries and other sensitive data. This helps to maintain data integrity and reduces the risk of accidental or unauthorized changes.
Note: You can customize each role from the Role List tab if you want to restrict access to sensitive features like journal entries or closing date settings.
Verifying and rebuilding your company file helps to detect and resolve common issues that may affect journal entry numbering or transaction accuracy. It’s a crucial step to maintain data integrity especially before making major changes like resetting journal entry numbers.
Note: Contact the QuickBooks Support Team before you rebuild your data in case you use Assisted Payroll.
Note: Don’t replace your existing company file. You need to re-enter the info into your company file since the backup was created.
To avoid auto-numbering and entry lock errors in QuickBooks Desktop Enterprise 2024, ensure consistent numbering settings, limit manual edits, assign appropriate user roles & permissions, and have all users log out during backups or file maintenance.
Don, I understand how challenging it can be when something as routine as managing journal entries turns into a technical issue, especially when you rely on QuickBooks Desktop Enterprise 2024 to keep your financial data accurate and up-to-date.
The good news is that these issues are manageable. Whether you’re resetting journal entry numbers, verifying your company file, modifying user permissions, or disabling auto-numbering, each step brings more control and stability to your accounting process.
To prevent similar issues down the line, stick to a few key practices: limit access to sensitive features, back up your data at regular intervals, turn off automation when manual input is preferred, and review user roles periodically. These small actions can make a big difference in keeping your records clean and your workflow uninterrupted.
If you ever need help troubleshooting QuickBooks-related issues like missing transactions or bank feed errors, don’t hesitate to reach out. You’re well on your way to maintaining a more secure and efficient financial system.

