Excerpt:
Recording non-cash contributions in QuickBooks is crucial for nonprofit organizations to maintain compliance with Generally Accepted Accounting Principles (GAAP) and IRS regulations. This process requires distinct methodologies for QuickBooks Online (QBO) and QuickBooks Desktop (QBDT). QBO utilizes an In-Kind Clearing Account paired with a Sales Receipt and a Bill to balance the double-entry, whereas QBDT often relies on a Credit Memo or Journal Entry. Accurate tracking demands strict adherence to the Fair Market Value (FMV), with documentation requirements increasing significantly for donations exceeding $\$5,000$, which often necessitate a qualified appraisal and the filing of IRS Form 8283. While most volunteer services are not recognized under GAAP, proper financial reporting hinges on using specific product/service items and ensuring all transactions are dated correctly according to the accrual method, regardless of the entry date, allowing essential reports like the General Ledger and the Statement of Activities to be audit ready.
 Add As A Preferred

Highlights (Key Facts & Solutions)
Overview
It is necessary to record non-cash donations in QuickBooks in order to ensure proper record keeping and financial reporting of all the contributions received in accordance with generally accepted accounting standards. It makes it easier for organizations to monitor financial inflows against the source, purpose, and type of the donations. The categorization of donations facilitates accountability and transparency of the financial status of the nonprofit organizations to the donors or other regulatory bodies.
Donations in QuickBooks can be defined as monetary or in-kind contributions received by an organization or individual. They are recorded and tracked to detect financial inflows and support.
These contributions can appear in various forms, such as cash, checks, stocks, tangible goods like clothing and equipment, and services or assets. Tracking donations in QuickBooks is important for financial management as it allows organizations to maintain correct records of all incoming funds, ensuring transparency and accountability.
Donations play an important role in supporting the organization’s ongoing activities, whether it be funding specific projects, contributing to charitable initiatives, or covering operational expenses. By managing the donations received, organizations can enhance their financial resources to achieve their operations and serve their beneficiaries effectively.
To record non-cash charitable contributions in QuickBooks Desktop, there are several steps to follow: first, create an invoice for the donation; second, configure an account for donations; third, configure a product item for donations; and lastly, issue a credit note of the donation value.
To create an account for recording donations, go to Lists > Chart of Accounts, click New, select Expenses as the Account Type, enter the account name, and save.
Note: You can contact your accountant to consult about the accounts to use when creating this account.
To create a product/service item for donations, go to List > Item List, click New, select Inventory Part, choose your donation account from the Income account field, and save.
Step 1: Navigate to the Item List
First, go to List at the top menu bar and choose the Item List.
Step 2: Select the New Option
Now, tap on the arrow beside Item and select New.
Step 3: Add the Necessary Details
Then, under the Type, choose the Inventory Part. Now, utilize the account you’ve made from the drop-down List in the Income account field. Add the necessary details needed. Click on the OK button.
The issue a credit memo for donated products, select the customer and choose Create Credit Memos/Refunds. Enter the details, then click Save and Close.
Step 1: Navigate to Create Credit Memos/Refunds
First, choose the customer and tap on Create Credit Memos/Refunds.
Step 2: Enter the Details
Now, enter the information of the credit memo or refund.
Step 3: Save the Changes
Once you’re done and satisfied, click on the Save and Close button.
In-kind contribution means facilities, goods, or services provided without charge for use by the organization, such as space, equipment, or staff services. Recording such donations into QuickBooks Online involves developing accounts, including product/service items and donation entries.
Note: Confirm with your accountant if a donation has to be recorded as in-kind.
Ensure that you still need to get an in-kind donation account in your chart of accounts; this will avoid duplicates. To check for an in-kind donation account, go to Settings > Chart of Accounts. Search for “In-Kind Donations.” If none exists, create a new account to avoid duplicates.
Step 1: Navigate to the Chart of Accounts
First, go to settings, then choose the Charts of Accounts option.
Step 2: Enter the Details
Now, in the Filter by name or number field, enter the In-Kind donations details.
Step 3: Create an In-kind Account
After searching, if no account appears, you can now create an in-kind donations account.
Note: If an account named In-Kind Donations appears, then your chart of accounts is already set up.
If you have an in-kind donation account already, you’re not required to create a new one. You can skip this step and proceed to another one.
Step 1: Navigate to the Chart of Accounts
First, navigate to Settings, then choose the Chart of Accounts option.
Step 2: Enter the Details
Now, select the New option. Then, in the Account name field, enter In-kind donations.
Step 3: Choose the Nonprofit Income option
Then, from the Account type drop down menu, choose Income. After this, from the Detail type drop-down menu, choose Nonprofit Income. Now, Save the changes once you’re satisfied.
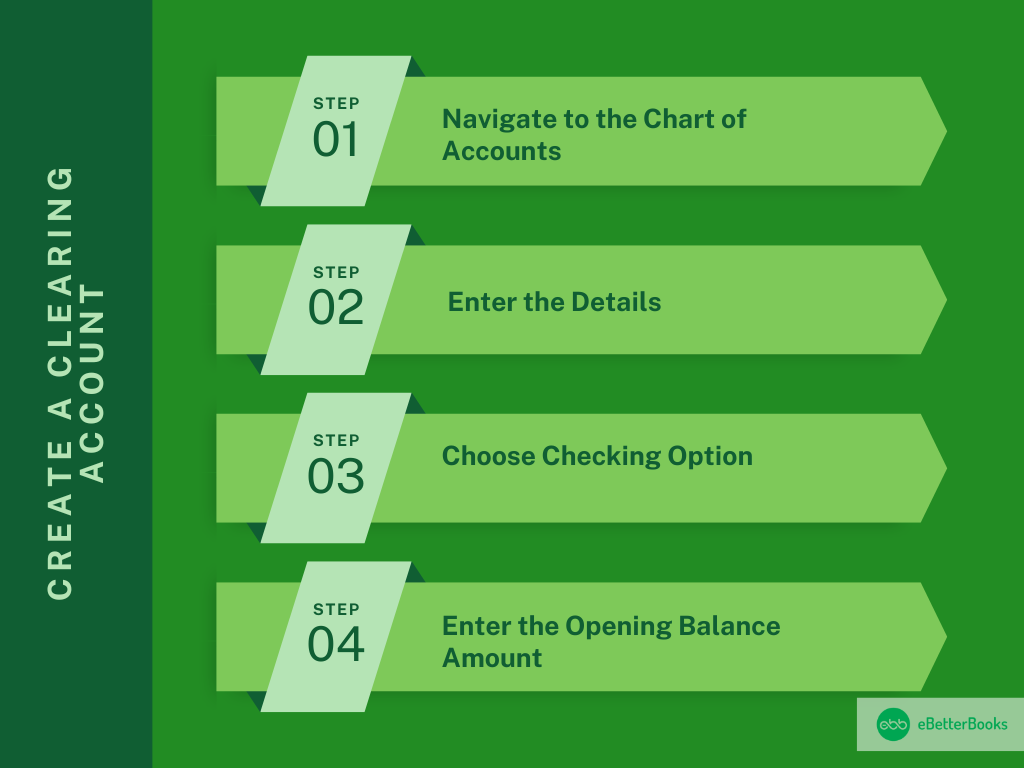
Make a clearing account to keep track of your in-kind donations. This will help you record your in-kind donations, sales receipts, or bill payments.
Step 1: Navigate to the Chart of Accounts
First, go to the Settings menu, and then choose the Chart of Accounts option.
Step 2: Enter the Details
Now, select the New option. Then, in the Account name field, enter In-Kind Clearing.
Step 3: Choose Checking Option
Then, from the Account type drop-down menu, choose the Bank option. After that, from the Detail type drop-down menu, select the Checking option.
Step 4: Enter the Opening Balance Amount
Now, from the Opening balance field, enter the opening balance amount. Then, choose the starting date in the Date field. Choose the Save option at last once you’re satisfied.
Note: The opening can be 0
Make a product or service item for every in-kind donation you receive and correctly track what you have. This will allow you to record in-kind donation items to your books for a more comprehensive financial report.
Step 1: Navigate to Products and Services
First, go to Settings, then choose the Products and Services option.
Step 2: Enter the Details
Now, choose New, then select the Services option. Then, in the Basic info menu, enter the name, item type, and category of the Item.
Step 3: Choose In-Kind Donations Option
Then, from the Sales section, choose the In-kind donations option from the Income account drop down menu.
Step 4: Choose Create New Option
After this, from the Purchasing section, choose I purchase this service from a vendor option. Then, select Create New.
Note: You have the option to add your product description or purchase cost as needed.
To record the in-kind donations, you can make a sales receipt and a bill and mark it as cleared.
Note: If you’ve received fixed assets like vehicles, computers, or land, then you can utilize an expense or fixed asset account on the bill. You can ask your accountant if you need clarification on whether an item is a fixed asset.
To create a sales receipt for a donation, go to + New > Sales Receipt. Select a customer, enter the donation date, choose the in-kind donation item, enter the fair market value, and save.
Step 1: Navigate to Sales Receipt
First, go to the + New, then choose the Sales Receipt option.
Step 2: Choose a Customer
Now, from the Customer drop down menu, choose a Customer.
Note: If you still need to set up your customer, then select the + Add new option.
Step 3: Enter the Details
Then, from the Sales Receipt Data field, enter the date of the donation.
Step 4: Choose the In-kind Donation Item
In the Deposit To drop down menu, choose the In-kind Clearing bank account you’ve created. Then, from the Product/Service drop-down menu, choose the in-kind donation item and add the description in the Description field.
Step 5: Enter the Fair Market Value
Now, in the Amount field, enter the fair market value (FMV) of the donation. When satisfied, select Save and close.
Note: If you need to be made aware of the fair market value of the donation, ask your accountant.
To create a bill for an in-kind donation, go to + New > Bill. Select the donor, choose the in-kind donation item, enter the fair market value, and save.
Step 1: Navigate to Bill
First, go to the + New option, then choose Bill.
Step 2: Enter the Details
Now, from the Vendor drop-down menu, choose the donor’s name.
Note: If from the vendor list, you’ve set up your donor’s name then choose + Add new.
In the Item details menu, choose the in-kind donation item from the Product/Service drop-down menu.
Step 5: Enter the Fair Market Value
Now, in the Amount menu, enter the donation’s fair market value (FMV). Then, choose the Save and Close option.
Note: If you’re different from the fair market value of the donation, ask your accountant.
To mark a bill as cleared, go to + New > Pay Bills, select the In-kind Clearing account, check the bill to mark it as paid, and then save and close.
Step 1: Navigate to Pay Bills
First, go to + New, then choose Pay Bills.
Step 2: Choose In-kind Clearing
Now, from the Payment account drop-down menu, choose the In-kind Clearing option.
Step 3: Save the Changes
Choose the checkbox of the bill which you have entered. Once satisfied, select the Save and Close button.
The process of recording non-cash donations in QuickBooks allows for clear visibility of funds received and how they are assigned, providing stakeholders, including donors and sponsors, with confidence in the organization’s financial management.
Recording non-cash donations in QuickBooks goes beyond basic entry—it requires strategy, accuracy, and compliance. This section uncovers key operational insights that help nonprofits avoid common mistakes, ensure transparency, and strengthen financial reporting. You’ll explore clear distinctions between QuickBooks versions, master FMV assignment, avoid costly errors, generate actionable reports, and understand the accountant’s critical role. Each topic offers practical value with at least three takeaways, short sentences, and a direct tone. Whether you’re refining your current workflow or building one from scratch, these insights will elevate your donation tracking with clarity, confidence, and compliance.
QuickBooks Desktop uses a 4-step method—invoice, donation account, product item, and credit memo—while QuickBooks Online follows a 5-step flow—account setup, clearing account, product/service, sales receipt, and bill. In Desktop, donations are tracked using Chart of Accounts > Expenses, whereas Online uses Income > Nonprofit Income for categorization. Online requires a clearing account for balancing entries; Desktop doesn’t. For Desktop, you issue a credit memo; for Online, you record a sales receipt and bill. These structural, functional, and procedural differences affect workflow, reporting accuracy, and compliance. Choose your method based on team size, reporting needs, and donation types.
Always use three reliable sources to determine the Fair Market Value (FMV)—market listings, donor-provided receipts, and professional appraisals. Compare item condition, resale value, and relevance before recording. For consistency, maintain an FMV documentation folder, update it monthly, and involve your accountant in every valuation above $500. Avoid estimates—QuickBooks entries must reflect real, justified, and traceable values. For items like equipment, use IRS Publication 561 as a standard. Correct FMV ensures accurate financial reporting, donor trust, and audit readiness. It’s not just a number; it’s a legal, financial, and ethical obligation.
Avoid using cash income accounts for in-kind donations—this causes reporting errors, tax issues, and misclassified entries. Never skip assigning an FMV, as it leads to non-compliant records, misleading reports, and audit risks. Don’t forget to create separate product/service items—this ensures clarity, tracking, and transparency. Skipping the clearing account in QuickBooks Online breaks the balancing process, creating incomplete and confusing ledgers. Lastly, avoid vague donor names like “Anonymous”; use internal codes, references, or tags for traceability. These mistakes damage data integrity, donor confidence, and financial accuracy. Fixing them later costs time, effort, and credibility.
In QuickBooks, use “Custom Transaction Detail”, “Sales by Product/Service”, and “Profit and Loss by Donor” reports to track in-kind donations. Filter by account type, donation item, and date range for precise results. Tag each donation with class, location, or donor name to enhance report segmentation, analysis, and traceability. Set report frequency to monthly, quarterly, and annually to match your audit cycles. Export in Excel or PDF formats for sharing with boards, auditors, or donors. Proper reporting improves compliance, donor communication, and strategic planning, making your data not just accurate but also actionable, readable, and useful.
Accountants verify in-kind donations by validating FMV sources, chart of account usage, and item categorization. They ensure compliance with GAAP, IRS rules, and nonprofit standards. Their role includes auditing donation entries, clearing account balances, and supporting documents. They also assist in identifying fixed assets, taxable items, and restricted donations. Accountants provide monthly checks on entry accuracy, donor tracking, and financial impact. Involving them ensures transparency, prevents penalties, and builds donor trust. Their insight protects your organization’s integrity, credibility, and sustainability—they’re not optional; they’re essential, accountable, and strategic partners in donation management.
Beyond basic workflows, mastering non-cash donation tracking in QuickBooks requires clarity on related areas that impact compliance, efficiency, and financial health. This section offers five high-impact supplementary insights designed to fill critical knowledge gaps. You’ll understand the difference between cash and in-kind donations, explore legal and tax obligations, and learn how to use third-party tools to simplify tracking. Additionally, you’ll get practical tips on auditing your data and training your staff for consistent accuracy. These topics are structured to deliver fast, actionable, and focused takeaways that elevate your donation recording from routine to robust.
In-kind donations are non-monetary items like goods, services, or equipment; cash donations are direct monetary contributions through checks, transfers, or online portals. In-kind support often includes volunteer time, office space, or materials, while cash funds cover budgets, salaries, or operations. Tracking in-kind donations requires FMV assignment, item creation, and clearing entries; cash needs only simple deposit or invoice recording. Both affect financial planning, compliance, and donor reporting, but are handled differently in QuickBooks. Understanding these differences helps nonprofits manage diverse resources, comply with standards, and build stronger financial strategies across all donation types.
Improperly recorded in-kind donations can trigger IRS audits, tax penalties, or donor disputes. The IRS requires accurate FMV, proper categorization, and donor acknowledgment letters for items over $250. Nonprofits must follow GAAP rules, IRS Form 990 standards, and local regulations. Missing details like item description, condition, or usage purpose can invalidate deductions. QuickBooks helps maintain audit-ready, timestamped, and transparent records, but only if set up correctly. Ignoring legal steps risks credibility, funding eligibility, and tax-exempt status. Always consult a tax professional to ensure your entries are legally sound, financially compliant, and donation-friendly.
Third-party apps like DonorPerfect, Kindful, and NeonCRM integrate with QuickBooks to automate donation entry, donor data sync, and FMV tracking. These tools offer features like real-time dashboards, receipt generation, and multi-source imports. They reduce manual work by handling recurring gifts, batch entries, and campaign tracking. Integration ensures consistent formatting, duplicate prevention, and cross-platform reporting. Most apps support custom fields, nonprofit tagging, and donor segmentation, making data cleaner and more actionable. Choosing the right app enhances efficiency, accuracy, and audit readiness. Use them to scale donation management with less effort, fewer errors, and deeper insights.
Auditing non-cash donations involves reviewing FMV sources, item entries, and supporting documents. Start by checking the Chart of Accounts, Product/Service setup, and clearing transactions. Verify that each donation has linked receipts, valuation proof, and donor details. Use QuickBooks reports like General Ledger, Audit Log, and Donation Summary for detailed cross-checking. Look for duplicate entries, inconsistent categorization, or missing memos. Monthly internal audits ensure record accuracy, regulatory alignment, and fraud prevention. Involve your accountant to validate legal compliance, financial impact, and system integrity. A structured audit protects your organization with clarity, confidence, and control.
Train staff on QuickBooks navigation, donation workflows, and entry protocols using real examples. Focus on teaching FMV assignment, product/service setup, and account selection to reduce errors. Use internal guides, video tutorials, and hands-on simulations for effective learning. Assign roles based on access levels, donation types, and review responsibility to improve data security. Conduct monthly reviews to catch entry mistakes, misclassifications, or missed documentation. Well-trained staff ensures accuracy, speed, and audit readiness in donation recording. Continuous learning leads to stronger compliance, smoother operations, and higher donor trust—making your team both efficient and reliable.
The core difference lies in the method of balancing the double-entry:
Accounting for donated fixed assets requires capitalization under GAAP:
The documentation requirement is tiered based on the value of the non-cash donation, as governed by the IRS:
The In-Kind Clearing Account in QuickBooks Online acts as a temporary holding account to preserve the integrity of the cash accounts:
Under U.S. Generally Accepted Accounting Principles (GAAP), most volunteer services are not recognized in the financial statements to maintain reliability in valuation.
If the services are non-specialized (like general office help), they are documented via operational metrics but are excluded from the Statement of Activities.
The ability to categorize and isolate in-kind value is crucial for tax and grant compliance, particularly for IRS Form 990:
The Accrual Basis of Accounting, which nonprofits typically follow, requires that economic events be recorded in the period they occur, regardless of when the entry is made:


