What is Quick Fix My Program?
Quick Fix My Program is one of the most popular tools from the QuickBooks Tool Hub used to resolve the common errors which occur at the time of installing, updating or accessing QuickBooks applications in your system.
Quick Fix my Program scans and reviews the system files and looks for common errors that mostly impact the functioning of QuickBooks application. While finding the most common errors, this program attempts to fix/ resolve them without affecting user files or data.
QuickBooks Tool Hub is a one stop solution for all the errors such as technical, functional, installation or data transfer and data migration. It is a comprehensive utility released by Inuit where a variety of tools compile at one place and diagnose or fix different QuickBooks-related problems at once.
Running a repair in QuickBooks using Quick Fix My Program is needed to repair issues related to program damage or if you’re not able to open/restore the company file, run reports, do online banking, access payroll, or even start QuickBooks software.
How to Run and Use the Quick Fix Program from the Tool Hub?

To use Quick Fix My Program, first download and install the QuickBooks Tool Hub if you haven’t done so yet. This tool helps diagnose and rectify several QuickBooks errors, which can be data, network, and program-related, by closing all unnecessary programs and performing quick repairs. For efficiency, use the steps in the Tool Hub to fix such issues, as suggested here.
Step 1: Download & Install QB Tool Hub
The QuickBooks Tool Hub helps you to fix common company file errors, connection errors, Windows problems, diagnostic errors, update errors, and network-related issues.
Let’s see how:
Note: You are recommended to use the tool hub on Windows 10, 64-bit.
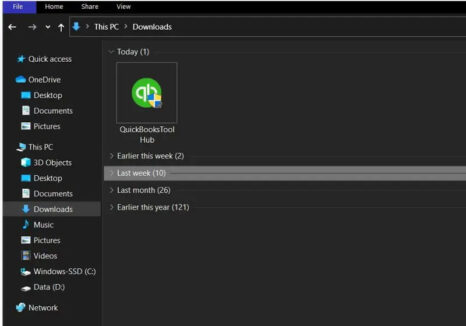
- Firstly, shut down QuickBooks and download the latest QuickBooks Tool Hub version from the official Inuit website.
Note: The most recent tool hub version is 1.6. 0.3. - Now, save the file to a location that is easily accessible, like your Downloads folder or Windows desktop.
Remember: If you have already installed Tool Hub, you need to find out which version you’re using. For this, do the following:
- Click the Home icon, and the version will display at the bottom right corner of the screen.
- You can also choose the option About to view the version.
- Open the File you downloaded earlier named QuickBooksToolHub.exe.
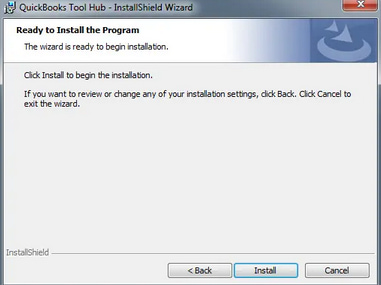
- Press Yes to follow all the on-screen instructions and agree to the terms and conditions.
- After this, hit the Next icon and select the Install option.

- When the installation comes to an end, select the Finish tab.

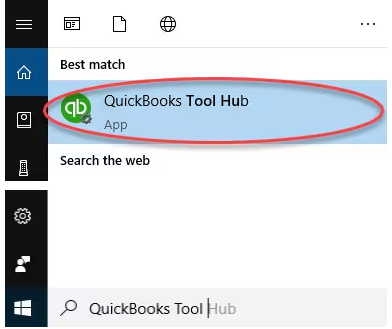
- Later, click the Windows desktop icon twice to open the tool hub program.

Important Note: Hold and Press the Windows or Start key if you are unable to locate the icon, and then search for QuickBooks Tool Hub. Once found, choose the program to open it.

Step 2: Run Quick Fix My Program
The Quick Fix My Program closes all the existing background processes QuickBooks uses and allows you to run a quick repair on your program. Below are the steps you need to follow:
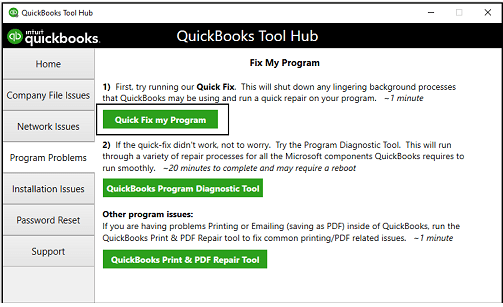
- To begin with, choose the Program Problems option under the QuickBooks Tool Hub.
- Next, select Quick Fix My Program from here, and then let the tool diagnose and repair the existing glitch in your QB Desktop application.

- Restart the QuickBooks Desktop and open your data file.
Summing it up!
With the help of Quick Fix My Program, you can easily repair any program damage that is usually noticed while using, installing, or updating the software.
But if you don’t know how to run this utility in your system or you have multiple queries related to the same, feel free to contact our dedicated experts at +1-802-778-9005.
FAQs!
How does Quick Fix My Program help to repair damaged QuickBooks Desktop files?
By selecting Quick Fix My Program from the QB tool hub, you can eliminate many common errors from your system, such as company file errors, network or data errors, program-related errors, and much more.
Can I download Quick Fix My Program on my system?
Quick Fix My Program is a part or a component of the QuickBooks Tool Hub. To run Quick Fix My Program in your system, you have to first download or install the QuickBooks Tool Hub, navigate to the Program Problems window, and then select the Quick Fix My Program option from here.
How long does the “Quick Fix My Program” process typically take to complete?
The duration can vary based on your computer’s speed and the size of your QuickBooks company file. Typically, the process takes between 5 to 15 minutes. It is essential not to interrupt the process once it has started, as this can lead to further data corruption. You should see a notification on your screen when the repair is finished.
Will running “Quick Fix My Program” affect or change any data within my QuickBooks company file?
No, it should not. The “Quick Fix My Program” tool is designed to repair only the QuickBooks application files, components, and Windows registry entries associated with the program. It does not access, modify, or repair your specific company data file (.QBW). However, always back up your company file before any major troubleshooting step as a best practice.
Is it necessary to close all other applications on my computer before running the Quick Fix My Program tool?
Yes, you should close all programs, especially QuickBooks Desktop. Intuit officially advises closing all open instances of QuickBooks and its related processes. Closing other unrelated programs (like web browsers or word processors) is also a good general practice to free up system resources and prevent potential conflicts that could interfere with the repair process.
Disclaimer: The information outlined above for “How to Run & Use Quick Fix My Program” is applicable to all supported versions, including QuickBooks Desktop Pro, Premier, Accountant, and Enterprise. It is designed to work with operating systems such as Windows 7, 10, and 11, as well as macOS.
